Adding a new Wiki Page
WARNING
Contributing to the wiki is currently limited to Alderon Games staff and selected community members. If you are interested in contributing, please create a github account and wait for further instructions.
There are two primary ways to add a new page to the wiki. For both methods, you will need to have a GitHub account and be logged in. If you do not have a GitHub account, please create one.
INFO
Please make sure to follow the Contributing Guidelines if you want to contribute to the wiki.
Here is a video tutorial on how to add a new page to the wiki using the GitHub web interface:
Using the GitHub Web Interface
This is the easiest way to add a new page to the wiki as it requires no additional software or setup. There are a few different steps involved in this process, so make sure to follow them carefully.
In order to add a new page to the wiki using the GitHub web interface, follow these steps:
Adding a New Page
- Navigate to the
server-wikirepository on GitHub under theAlderon-Gamesorganization. You can find the repository here.
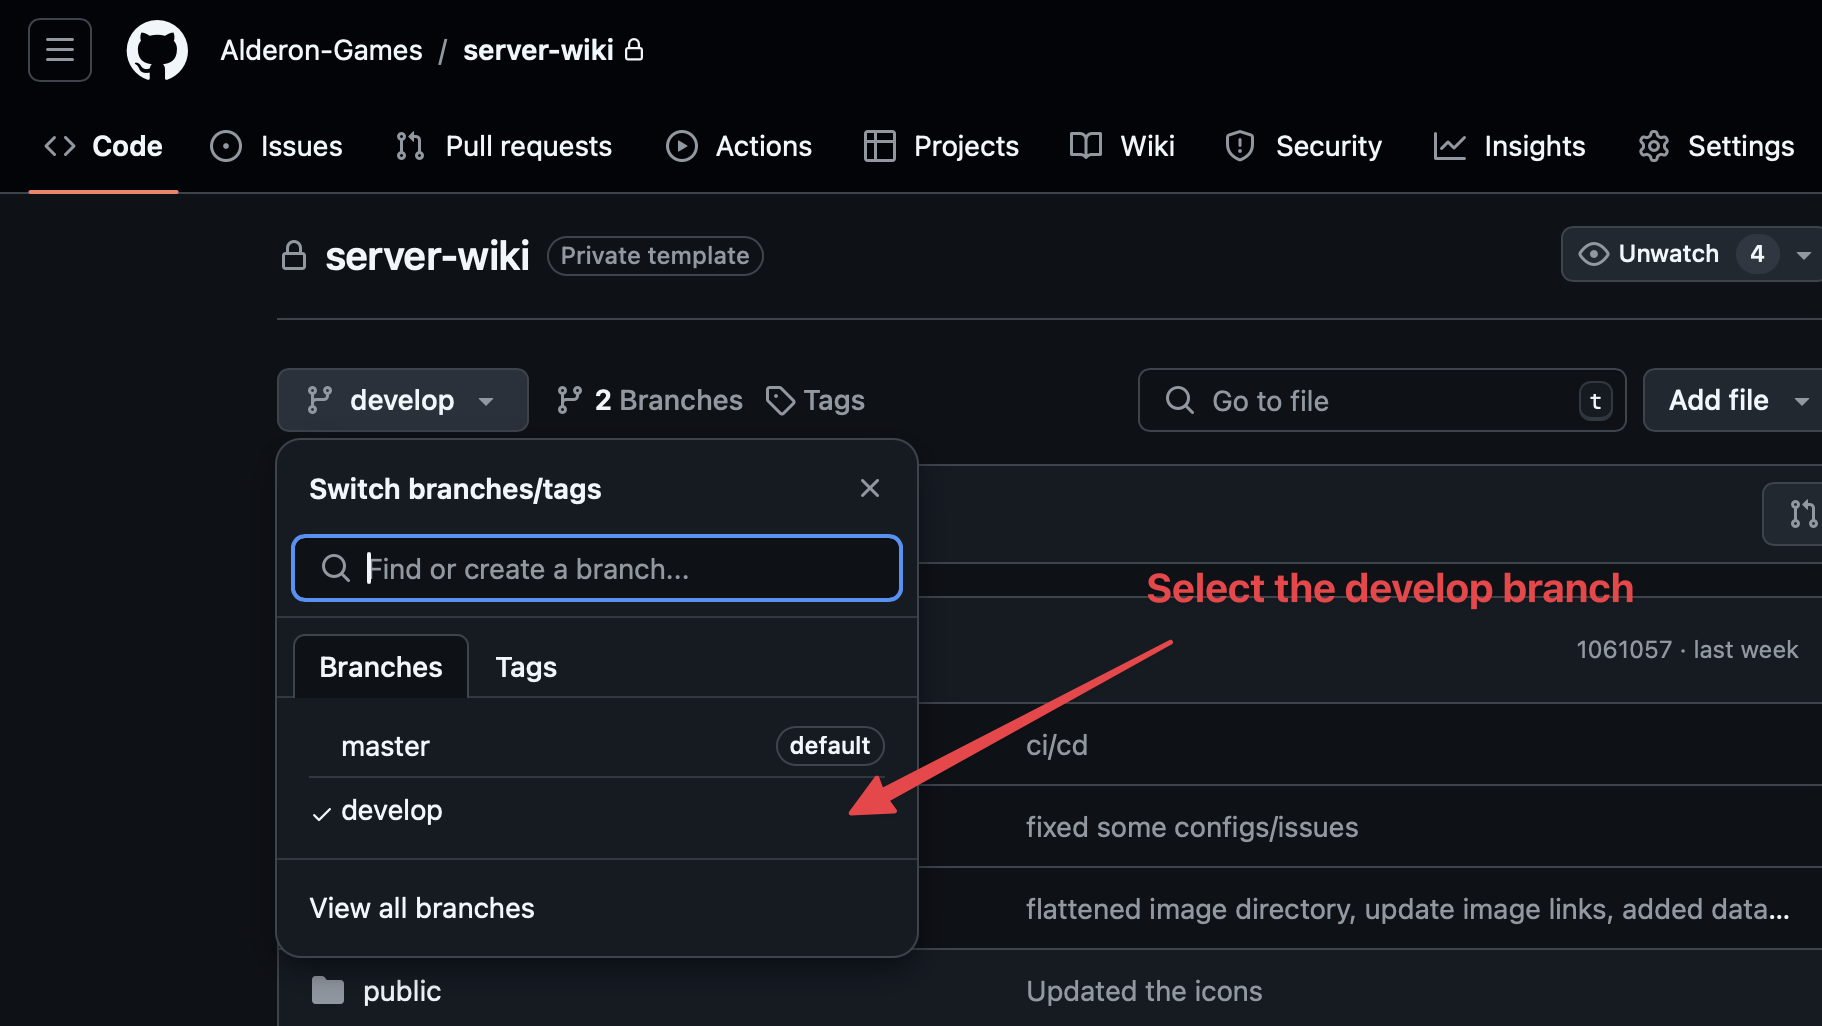
WARNING
Make sure you are on the develop branch before proceeding. You can only create a new page/PR from the develop branch.
Browse through the directory to find the appropriate location for your new page. For example, if you want to add a new page under the
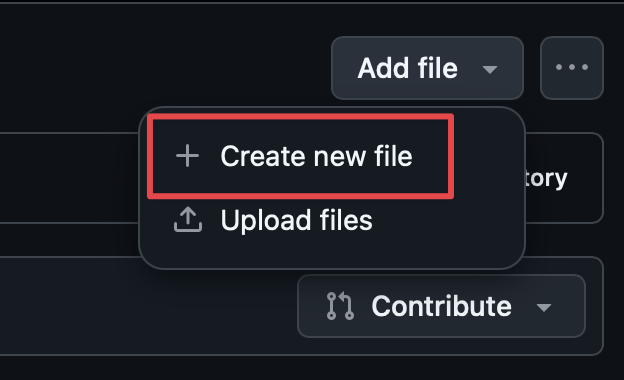
guidesection, you would navigate to theguidedirectory.Once you have found the appropriate location, click on the
Add filebutton and then selectCreate new file. You can also upload an existing file if you have one using theUpload filesbutton.
- Name the file with the appropriate name, ensuring that it ends with
.md. For example, if you are adding a new page about theserver setup, you could name the fileserver-setup.md.
DANGER
Please make sure the extension is .md as this is the markdown file extension.

Add all the images and other resources (to the
imgsfolder) that you want to include in the new page. You can do this by dragging and dropping the files into the GitHub interface. You can also use theAdd filebutton to upload the files.Add the content of the new page in the markdown format. You can use the markdown editor provided by GitHub to preview the content as you write it. You can also use the markdown guide provided by GitHub to learn more about markdown.
TIP
There are some additional components that you can add to your markdown file to make it more interactive. You can find more information about these components in the Wiki Components page.
Once you have added the content, press on the
Commit changes...button at the top right of the page.Add a commit message that describes the changes you have made. For example, you could write
Add new page about server setup. (OPTIONAL: You can also add a description to provide more context about the changes you have made.)
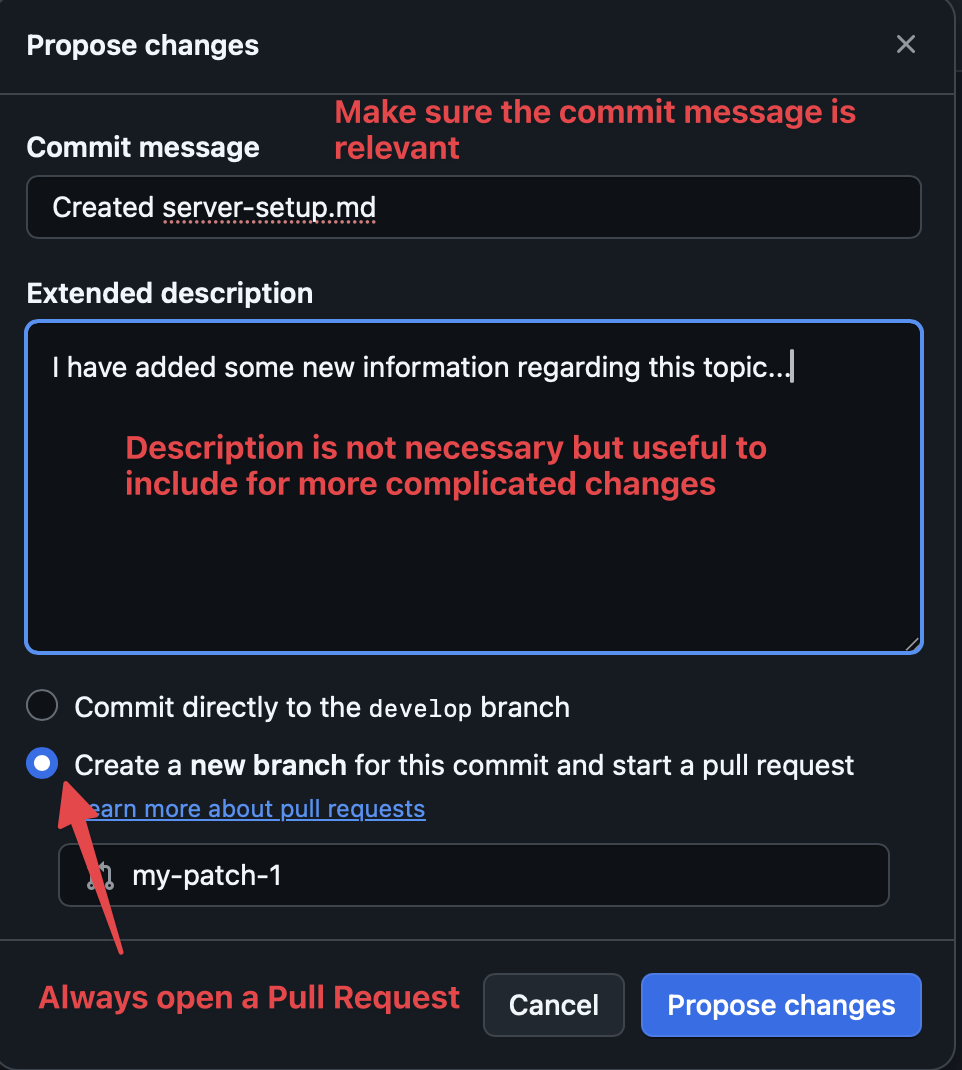
- Ensure that you have selected the
Create a new branch for this commit and start a pull requestoption. This will create a new branch and open a pull request for your changes.
WARNING
Make sure you are creating a new branch for your changes. This will help in keeping the changes separate from the main branch until they are reviewed and merged.
Press the
Propose changesbutton to create the pull request. This will open a new page where you can review the changes you have made and create the pull request.That's it for this step! You have successfully added a new page to the wiki using the GitHub web interface. Now, you can wait for the changes to be reviewed and merged by the maintainers.
Modifying Configuration Files
This step only applies while adding a new page or modifying the name of a page. This step ensures that your page is actually displayed in the sidebar where you want it to be.
Similar to the previous step, navigate to the
server-wikirepository on GitHub under theAlderon-Gamesorganization. Make sure you are on thedevelopbranch.You can find the
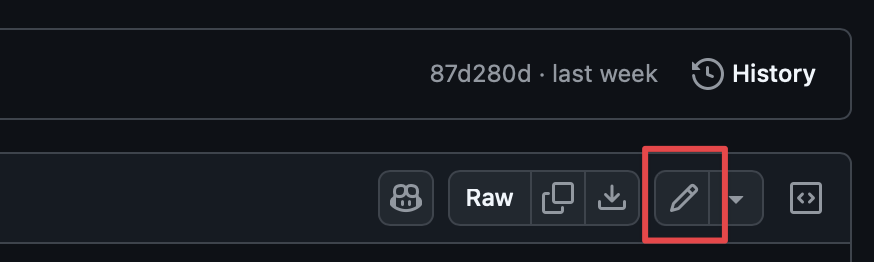
config.jsonfile in the root directory of the repository. Click on the file to open it.Click on the pencil icon at the top right of the page to edit the file.
- Add the new page to the appropriate section in the
config.jsonfile. For example, if you are adding a new page under theGuidessection, you would add the new page to theGuidessection (in this case,Server Setup).
{
    ...
    "themeConfig": {
        ...
        "sidebar": [
            ...
            {
                "text": "Guides",
                "items": [
                    ...
+                   { "text": "Server Setup", "link": "/guide/server-setup" },
                    ...
                ]
            },
            ...
        ],
        ...
    },
    ...
}
WARNING
Please make sure the link property is the same as the name of the file you created in the previous step. The path should be from the main directory of the repository.
You do not need to add the .md extension to the link property.
Once you have added the new page to the
config.jsonfile, press on theCommit changes...button at the top right of the page.Similar to the previous step, add a commit message that describes the changes you have made. For example, you could write
Add new page to the sidebar. (OPTIONAL: You can also add a description to provide more context about the changes you have made.)Ensure that you have selected the
Create a new branch for this commit and start a pull requestoption. This will create a new branch and open a pull request for your changes. Then, press thePropose changesbutton to create the pull request.
Using VSCode and Git
This method requires you to have VSCode and Git installed on your system. If you do not have these installed, please download and install them before proceeding.
In order to add a new page to the wiki using VSCode and Git, follow these steps:
Cloning the Repository
Open VSCode and open a terminal window by selecting
View > Terminalfrom the menu.In the terminal window, navigate to the directory where you want to clone the repository. You can do this by using the
cdcommand followed by the path to the directory. For example, if you want to clone the repository to theDocumentsdirectory, you would do:
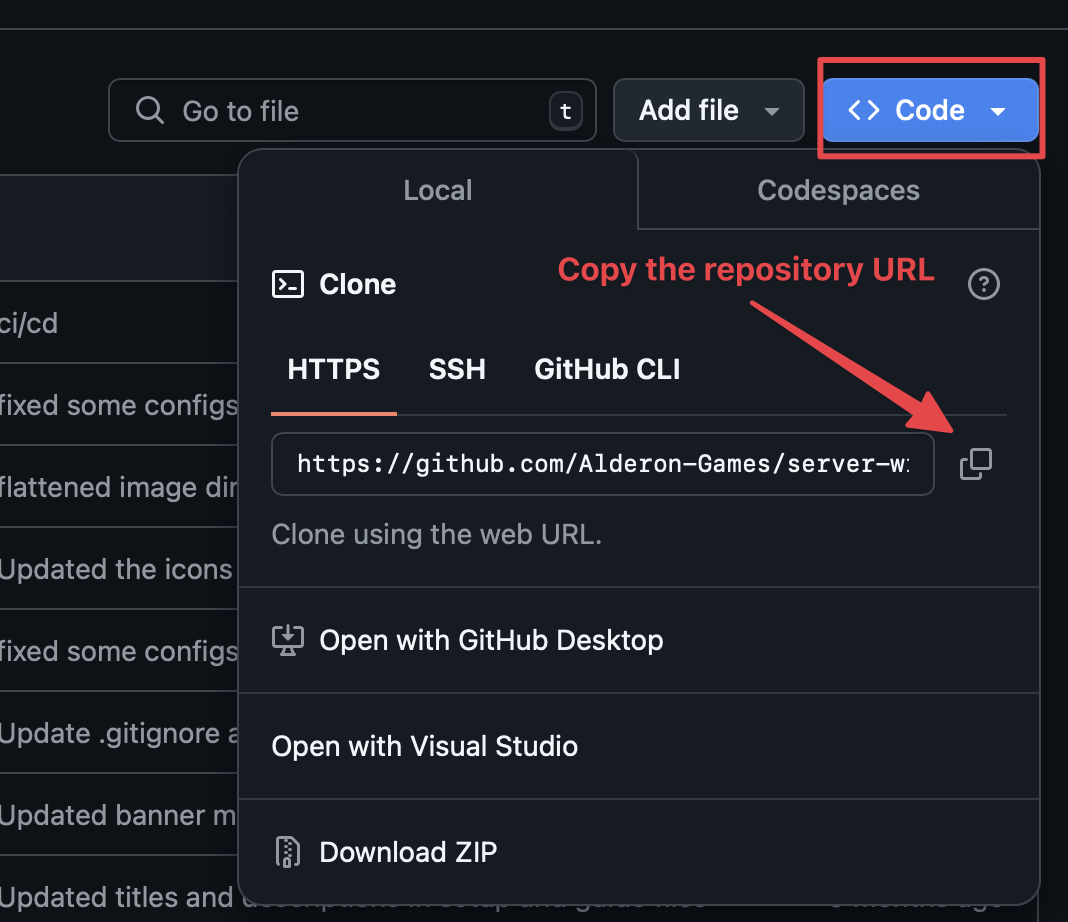
cd Documents- Once you are in the appropriate directory, we need to find the URL of the repository. You can find the URL by clicking on the
Codebutton on the GitHub repository page and copying the URL.
- Once you are in the appropriate directory, you can clone the repository using the following command in the terminal window. Replace
[repository-url]with the URL of the repository:
git clone [repository-url]- After cloning, navigate into the
[repository-name]directory. Replace[repository-name]with the name of the cloned repository:
cd [repository-name]Adding a New Page
- Once you are in the
server-wikidirectory, you can create a new branch for your changes. This will help in keeping the changes separate from the main branch until they are reviewed and merged.
git checkout -b new-page- Create a new markdown file in the appropriate directory. You can do this by using the
touchcommand followed by the name of the file. For example, if you want to create a new page about theserver setup, you could typetouch guide/server-setup.md.
TIP
You can also create the directory and files using the file explorer in VSCode. Right-click on the directory where you want to create the new file and select New File. Name the file with the appropriate name and add the .md extension.
touch guide/server-setup.mdAdd all the images and other resources (to the
imgsfolder) that you want to include in the new page. You can do this by dragging and dropping the files into theimgsfolder in the VSCode file explorer.Add the content of the new page in the markdown format. You can use the markdown editor provided by VSCode to preview the content as you write it. You can also use the markdown guide provided by GitHub to learn more about markdown.
TIP
There are some additional components that you can add to your markdown file to make it more interactive. You can find more information about these components in the Wiki Components page.
Make sure the changes are saved. Now, we need to commit the changes to the repository. Don't forget to modify the configuration files as mentioned in the previous section to ensure your page is displayed in the sidebar.
Add the changes to the staging area using the following command:
git add .- Commit the changes to the repository using the following command. Replace
[commit-message]with a message that describes the changes you have made:
git commit -m "[commit-message]"- Push the changes to the remote repository using the following command:
git push origin new-pageThis will push the changes to the remote repository and create a new branch. You can now open a pull request on GitHub to merge the changes into the main branch.
That's it for this step! You have successfully added a new page to the wiki using VSCode and Git. Now, you can wait for the changes to be reviewed and merged by the maintainers.